Git Bisect A.K.A. Pure Git Wizardry
Git's bisect command is one of those things you will wish you've known since you started using git at all.
I don't use it that often, but whenever I do I ask myself how did I live without this for so long. Since many people I talk to are not aware that git bisect exists, maybe it would be cool to teach more engineers out there about this timelife-saving tool.
First things first, what is git bisect?
Git's bisect command is a tool forged in the Olympus by all of the most powerful gods that ever existed for the delight of human software engineers. It allows you to find the commit that introduced a bug.
Finding bad commits is its primary utility, but you can actually use it to efficiently find any commits that match certain criteria, as I will show you later.
Let's say you've added 7 commits on your my-feature branch and someone merged a new PR on master with a few new integration tests you didn't have in your branch. Then you rebased your branch on master and now you've got failing tests. How would you find the commit that caused it to fail?
Well, before reading this blog post maybe you would start investigating the tip of your current branch (which has all those changes) or try rolling back commits one-by-one and re-running tests manually. Fortunately, your life has just changed and from now on you will use git bisect (yes, I do like being hyperbolic). bisect will then efficiently help you finding which commit caused that.
Cool, but how do I actually use it?
In the situation I've just described in the previous section, the first thing you would do is start bisect by running:
$ git bisect start
Then you need to tell git which revision (which commit, practically speaking) is bad. The command below tells git that the current revision is bad:
$ git bisect bad
Please notice that the bad commit doesn't necessarily need to be the one on the top of your branch, you can flag any commit as a bad commit by adding the commit you want to flag just after the command above. If the hash of the commit you want to flag starts with c77eb11 you could do this, for example:
$ git bisect bad c77eb11
After flagging the first bad commit you need to flag the first good commit you know. In order to do this you can just do git bisect good followed by the hash of the commit you want to flag:
$ git bisect good 4bdb7e8
Git will then checkout the commit in the middle of the range between those two and show you how many revisions need to be tested in order to find the bad commit, like this:
Bisecting: 3 revisions left to test after this (roughly 2 steps)
Now you need to run the tests and tell Git whether the current revision is good or bad. You can do that using the same commands as you used to flag commits initially:
$ git bisect good
$ # or
$ git bisect bad
After you flag the revision Git has just checked out it will move on to checking out the next one that needs to be tested and you must flag it too. Keep doing this for each revision Git checks out and then, when there are no revisions left to test, it will show you which is the first commit that does not work.
If you want to see the full list of revisions and their statuses (either good or bad) you can use git bisect log and you will see an output that looks like the following:
git bisect start
# bad: [1de25cdbbfe650dafb7b62d65b87baee56afc662] Add post about JS Fatigue
git bisect bad 1de25cdbbfe650dafb7b62d65b87baee56afc662
# good: [2529e01ce77e0f41c158c0ee6d138c5103457560] Fix factorial example
git bisect good 2529e01ce77e0f41c158c0ee6d138c5103457560
# good: [4bdb7e87f8bbde7243aa227aa4b576a40ba69f7e] Update about me section
git bisect good 4bdb7e87f8bbde7243aa227aa4b576a40ba69f7e
# bad: [3d16abba7b136fcd7cf959ba8ee5530ed1fa90da] Add Big-O blogpost
git bisect bad 3d16abba7b136fcd7cf959ba8ee5530ed1fa90da
# bad: [4b89555ab3e69f3417daef77518226a5e6a03a88] Change email
git bisect bad 4b89555ab3e69f3417daef77518226a5e6a03a88
# first bad commit: [4b89555ab3e69f3417daef77518226a5e6a03a88] Change email
Almost there but made a mistake? No worries! As you might have noticed, the output of git bisect log is formatted as a reproducible script, which means you can save the contents of git log to a file (by doing git bisect log > bisect_log for example), edit it and then use git bisect replay <filename> (in this case you will replace <filename> by bisect_log) to redo what you have done until that point.
If Git automatically checked out a commit you don't want to test for some reason (maybe it has an unrelated bug so you can't run your scripts accurately) you can just use git bisect skip. However, this might cause your problem this is what the official docs for git bisect (which you should definitely read too) says:
If you skip a commit adjacent to the one you are looking for, Git will be unable to tell exactly which of those commits was the first bad one.
Once you have discovered which commit is the one that introduced the problem you were tracking down (or if you just want to end bisect) you can use git bisect reset to reset the bisect state and go back to the top of the branch you were (the original HEAD).
Automating Git Bisect
As if git bisect wasn't already good enough, you can also automate it so you won't even need to keep testing each one of the commits Git checks out (this means you can go grab another cup of coffee while Git does all the hard work for you, as machines are supposed to).
In order to do that you just need to start git bisect as I have explained previously:
$ git bisect start
And flag the first good and bad commits (also in the same way we've done before).
Now you can just use git bisect run <command> <arguments>. Please notice that your command must exit with status code 0 for success or a status code from 1 to 127 (excluding 125). Since almost all test runners already do that right out of the box (at least all the good ones do), if you have any unit tests you're good to go.
So let's say you're using JavaScript and you run your tests by using npm test, all you need to do is run the following command after you have defined which is the first good and the first bad commit:
$ git bisect run npm test
Now go for a quick walk or go check HackerNews and make sure the cryptocurrencies you own haven't made you a billionaire yet on CoinMarketCap. When you come back to your terminal you will see which commit is the guilty one.
Git Bisect Behind the Scenes
Bisect is nothing but a binary search on commits which depends on you being able to tell whether a commit is good or bad.
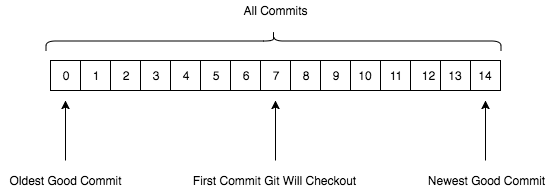
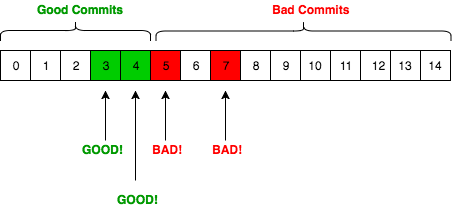
Let's say you have flagged the commit on the top of your branch as good and then, 14 commits before it, you have flagged a commit as bad, which means you've got a range of 15 commits. This is what Git will do:
Then, when you flag the commit it has checked out as good or bad, it will be able to tell whether it should go forward or backward. If you flag a revision as good it means the bug must have happened sometime in the future. If you flag a revision as bad it means the bug might have already been present before this one.
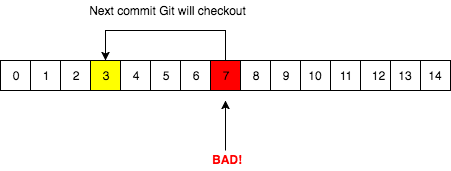
In this case, let's say that the 8th commit is already broken. This means that it's possible for the bug to have happened before, so Git will then checkout the commit in the middle of the range between the first and 8th commits: the 4th.
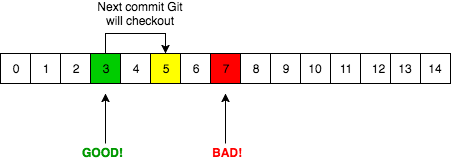
Now, telling git that the 4th commit is good is the same as telling it that the bug must have happened sometime in the future since all commits until this point in history will be considered good too. Git will then checkout the commit in the middle of the range between this good commit and the next bad one.
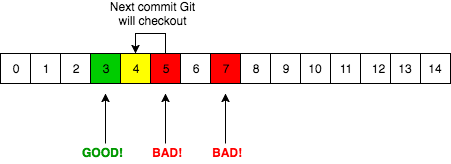
By flagging the 6th commit as bad we also tell Git that this might not be the first bad commit and therefore we must go back to the middle of the range between this bad commit and the last good one. In this case, we only have one commit left to check (the 5th one).
If the 5th commit is good it means that the revision just after it is guilty, if it's bad it will be considered the first commit to present the faulty behavior due to the fact that the revision just before it has been considered good.
This will be the final state of the bisection we've just run. As you can see, by doing a binary search bisect is able to find the last good commit and the first bad one by assuming that as soon as you mark a commit as good, all the ones before it are considered good as well and as soon as you mark a commit as bad, it assumes that all the ones after it are bad too.
Finding Changes
By now might think that I've forgotten about teaching you how to detect when a certain change has been introduced, but I didn't!
You could certainly run git bisect start and then mark every version without the feature as good and every version with the feature as bad. You could even create a script which checks this for you and then combine it with git bisect run. But that does not seem very semantic, does it?
Fortunately, the folks who write Git are awesome people and they thought about this. Instead of using bad and good you can simply use old for revisions which do not include that change and new for commits that do.
Like this:
$ git bisect old # this revision does not contain the change
$ git bisect good # this revision contains the change
Finding Anything
And the awesomeness continues.
You can find anything using bisect and still use semantic terms to show your peers how good of a hacker you are, just like Hugh Jackman on Swordfish.
Let's say you're looking for a certain change that made one of your buttons yellow instead of cyan (two colors that go really well on a red background). You could then remap good or bad to cyan and yellow, respectively, by using the following command:
$ git bisect start --term-bad yellow --term-new cyan
Now look how cool you are using yellow and cyan to flag your revisions:
$ git bisect yellow # This version has a yellow button
$ git bisect cyan # This version has a cyan button
Further Reading
This post is just an attempt to make git bisect more popular and accessible for everyone, so if you want more detailed information or if you want to go learn a few more tricks make sure you read these two pages from Git's own docs. People have done a great job writing those:
Wanna talk to me?
If you have any doubts, corrections or anything else you'd like to share with me you can reach me on twitter at @thewizardlucas or in the comments below :)
Subscribe
Get an email when I publish a new post. I'll never send you spam.
