How I Learned to Stop Worrying and Love vIM
Hello everyone! Well, I haven't been writing blog posts for a very long time, but today I got inspired and decided to write about something I love: vIM!
Also, I'm not sure if you have this in your country too, but in Brazil we've got a cleaning product called "VIM", but don't worry, that's not what I'm going to be talking about.

And, before we start, I really can't talk about vIM without thanking @vieiralucas for putting me into the "vIM secret club". Thank you buddy!
Why you should use vIM
I have always heard many people saying that learning vIM is too complicated and it doesn't pay off due to many reasons, even I have thought this before, but now that I don't anymore, let me dissect some of the most commonly used arguments against this awesome tool and then I will start giving you some tips.
Argument Number 1 - "vIM is Hard"
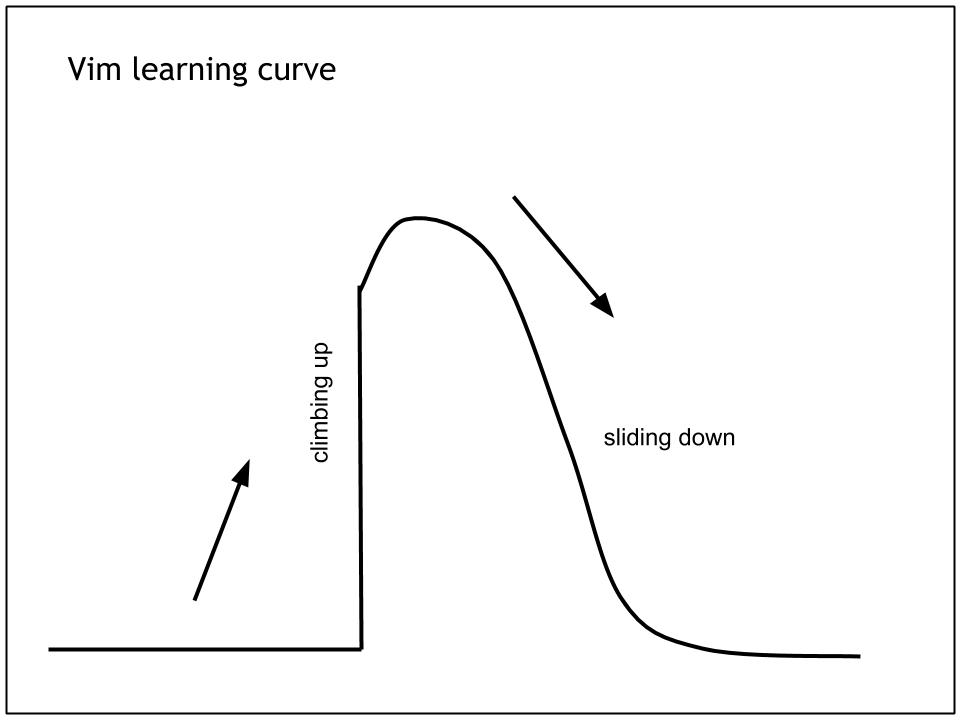
I have seen this image many times whenever someone talks about how hard they think it is to learn vIM. Well, I won't fool you, learning it is not really a piece of cake, but it's not as hard as fighting Tarrasque with level 5 characters on Dungeons & Dragons.
Learning vIM itself is not hard, it's just a matter of memorizing a few commands, and if you think this is too much work, later I will give you some tips to make it easier for you to create mental shortcuts for the most commonly used hotkeys.
In my opinion the hardest part is getting used to the basics, since vIM offers the user a whole new paradigm. At first you will get a little confused about how Normal Mode, Insertion Mode and Visual Mode work and you won't be able to do much but don't surrender! Pratice makes perfect.
After learning the basics, anything else will seem to be much easier.
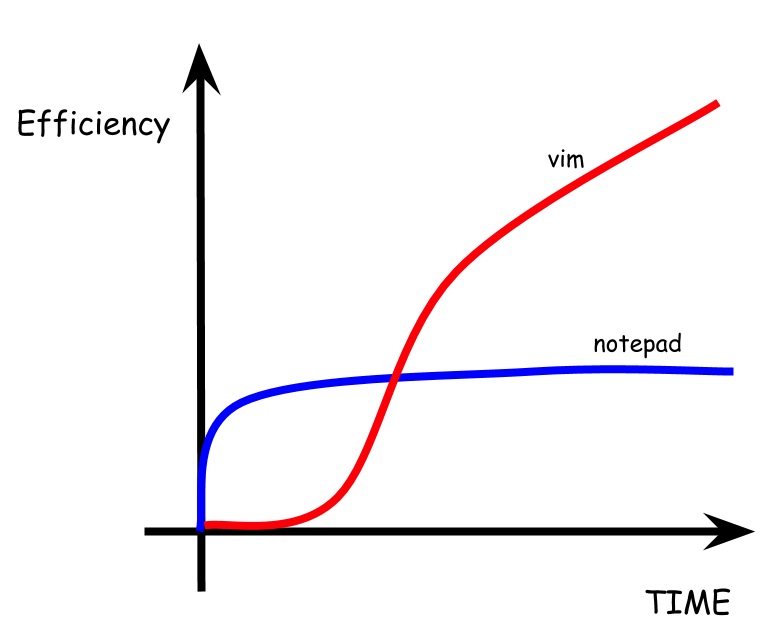
Even if at first you find it tempting to switch to whatever other editor you were using, don't do it! You will only learn vIM if you force yourself to use it. If you need any motivation for it, forget the first chart and put this one on your mind:
Argument Number 2 - "All those hotkeys are useless, after all, most of the time you are not even writing code"
Yes, most of the time you are not even writing code, you're just reading it. But vIM effiency isn't only about writing code, it's also about navigating through code, about managing files, and finding things.
Imagine living in a world where you don't need to use your mouse for anything, imagine being able to navigate faster and more freely with your keyboard than with your mouse. Sounds awesome, doesn't it?
And let me tell you another thing, it does not only make your work more efficient, vIM also makes it more confortable. vIM keys were designed to make you move your hands as little as possible and this is something you will easily notice after a few hours using it. Every key you need is within the reach distance of your fingers.
So, if you think learning vIM does not pay off, rethink. Anything that makes your work more pleasurable or efficient should be considered as an option.
Argument Number 3 - "My IDE is better"
Personally I'm not a big fan of IDE's. They offer you a bunch of cool features but in the end of the day everything just seems to magical and sometimes they even add more complexity to a task than they should (try using TomCat related features inside Eclipse for example).
vIM not only offers you a lot of plugins to suit your needs, but it also keeps things raw. When you use it you will be forced to learn what's underneath all those fancy buttons your IDE has. Using vIM makes you understand more about how things work and it may also make you a better programmer in general.
The simplicity of vIM is magical. Learn how to deal with it and it will improve your whole life.
Argument Number 4 - "vIM makes you look like a computer god"
This one is true. I can't deny.
Configuring vIM
Before starting to use vIM, let's configure it to make it easier for you to learn things correctly and create a pleasurable experience. All the configuration parameters described here should be written in your .vimrc, located at the root of your home folder.
If you just want to get a complete configuration file with some extra tips and skip reading this section feel free to go to my dotfiles repository and copy the whole .vimrc file. I highly recommend you to do that, but please, don't skip reading this section since it's really important to understand the configuration parameters you are using and tune them to your liking (if you want to).
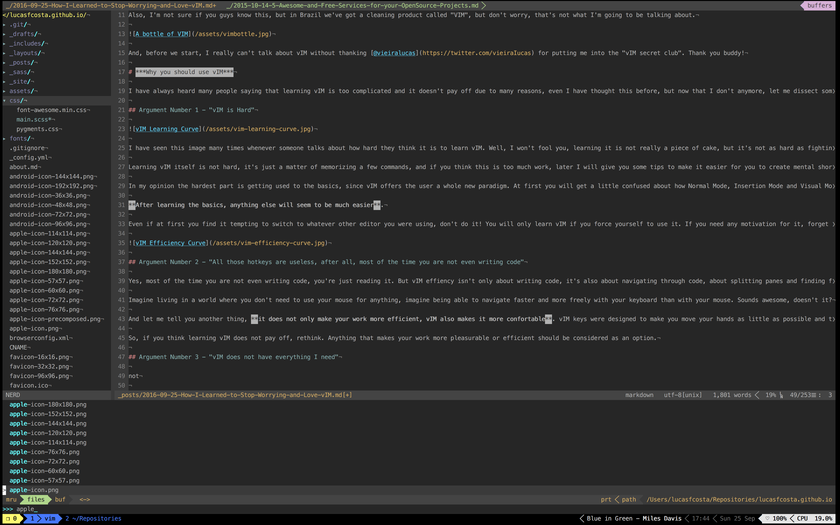
This is what your vIM should look like after following my instructions:
Step 1 - Unleashing Hell (also known as disabling arrow keys)
Thrust me, this is going to make you feel angry at first, but then you will thank me for making you use vIM the right way.
This awesome text editor was made for you to move your hands as little as possible and make you more efficient, so please, use it as the developers would like you to.
Copying and pasting this into your .vimrc should be enough. I like to leave it at the bottom of my configuration file because I can easily see all my custom key mappings there if I need to.
" dont use arrowkeys
noremap <Up> <NOP>
noremap <Down> <NOP>
noremap <Left> <NOP>
noremap <Right> <NOP>
" really, just dont
inoremap <Up>    <NOP>
inoremap <Down>  <NOP>
inoremap <Left>  <NOP>
inoremap <Right> <NOP>
PS: Especial thanks to @vieiraIucas for making me use this.
Step 2 - Syntax highlight and other almost mandatory settings
If you can live without syntax highlight you whether a god or a fool, there is no other option.
It's also interesting to always have your encoding settings set to UTF-8.
set encoding=utf-8  " The encoding displayed.
set fileencoding=utf-8  " The encoding written to file.
syntax on " Enable syntax highlight
Step 3 - Enable copying and pasting to/from vIM and the Clipboard
By default vIM uses it's own registers when copying/cutting text instead of using the system's clipboard, so you won't be able to paste things you copy inside it anywhere.
You can also use the + or * registers (or countless other tricks) if you want to work around that, but I find it easier to allow vIM to access system's clipboard and remap copy/paste related keys.
" copy and paste to/from vIM and the clipboard
nnoremap <C-y> +y
vnoremap <C-y> +y
nnoremap <C-p> +P
vnoremap <C-p> +P

" access system clipboard
set clipboard=unnamed
If you want to learn more about how key mapping works (I recommend you to), please read this article on vIM wiki or this StackOverflow answer (if you want to learn the basics only).
Step 4 - Make useful information always visible
It's always great to have line numbers as well as the status bar at the bottom of the screen, which will help you locating yourself within the file and show you some other important data.
Also, toggling the visibility of some characters will help you spotting undesirable trailing spaces and noticing line breaks and indentation more easily.
" line numbers
set number

" show the status line all the time
set laststatus=2

" toggle invisible characters
set invlist
set list
set listchars=tab:¦\ ,eol:¬,trail:⋅,extends:❯,precedes:❮
Step 5 - Configure Indentation
These are my favorite indentation settings, you can play with these values if you want to.
The comments above each setting are pretty self-explanatory, but if you need more details about them, you can access this link.
" Use spaces instead of tabs
set expandtab

" Be smart when using tabs ;)
set smarttab

" 1 tab == 4 spaces
set shiftwidth=4
set tabstop=4

set ai "Auto indent
set si "Smart indent
Step 6 - Enabling the Installation of Plugins
One of the greatest things about vIM is that it's highly customizable. Plugins make your experience with vIM more efficient and pleasurable.
Enabling the installation of plugins is perhaps the most important thing to do when configuring your editor since these plugins will be responsible for adding all the functionalities your vIM does not offer straight out of the box.
For that I recommend using Vundle, which is my favorite plugin manager.
Installing it is really simple, all you've gotta do is follow the instructions or their README.md file (which basically consists in a git clone, copying a bunch of things to your .vimrc and typing vim +PluginInstall +qall on your command line).
For now, don't worry about installing any plugins other than the ones in the step below, we will go through that in the next section.
Step 7 - Getting a beautiful vIM
Now, at last, but not least, let's have some pretty things on our interface for us to rejoice while coding.
Before anything you've gotta add this to your .vimrc, just under the plugins section:
" colorschemes
Plugin 'chriskempson/base16-vim'

" MOAR COLORSCHEMES
Plugin 'flazz/vim-colorschemes'

" vim-airline
Plugin 'bling/vim-airline'

" vim-airline-themes
Plugin 'vim-airline/vim-airline-themes'
Save the file, reopen vIM and type :PluginInstall, this will install the plugins you've just added to your .vimrc file.
Now that we have all the necessary plugins installed, let's configure them.
First we will configure vim-airline, which requires powerline-fonts, some pre-patched fonts for usage with vim-airline and powerline (which is similar to vim-airline).
To install powerline-fonts just clone their repo and run the ./install.sh script.
These are the configs you will need to paste on your .vimrc file:
" vim-airline
let g:airline_powerline_fonts=1
let g:airline_theme='bubblegum'
let g:airline#extensions#tabline#enabled=1
set guifont=Meslo\ LG\ S\ Regular\ for\ Powerline:h20
You can also change the theme and font to whatever you want, but I recommend you to use the same theme on your vim-airline as you do for the rest of your text-editor.
And finally, for the main colorscheme, here goes the config settings:
colorscheme bubblegum

" maintain terminal background
hi Normal ctermbg=none

" background and theme
set background=dark

" long lines as just one line (have to scroll horizontally)
set nowrap

" 256 colors
set t_Co=256
Also, you should check if your terminal emulator supports 256 colors to make sure everything will look fine. You can find more info on that at this link.
Useful Plugins
As I said before, vIM plugins offer many interesting features that aren't available right out of the box and some of these features are almost essential for you to have a good experience using vIM.
So, in this section, I will show you my favorite plugins and my settings for them.
Please remember to always run :PluginInstall after adding a plugin to your plugin list in order to install it.
Ctrlp
Science has already proved that fuzzy-finding improves the life quality of an average human by almost 327%, so we're going to use it:
Add Plugin 'kien/ctrlp.vim' to your plugin list and then I highly recommend you to use the setting below to avoid enabling search on folders like node_modules or anything like that.
let g:ctrlp_user_command = ['.git/', 'git --git-dir=%s/.git ls-files -oc --exclude-standard'] " only show files that are not ignored by git
Now all you've gotta do to find a file is press CTRL+p in visual mode and type its name, then you can press Enter to open it, CTRL+v to open it and split the screen vertically or CTRL+x to open it and split the screen horizontally.
NerdTree
Nerdtree is a tree explorer for vIM, it's that neat sidebar which shows folders and files you could see at my vIM's picture I showed before.
To install it add Plugin 'scrooloose/nerdtree' to your plugins list.
When using NerdTree I like to see every file in a directory, including the hidden ones. I usually want it to close after I find the file I want to open and I also like to have a handy shortcut to open it, so these are my favorite NerdTree settings:
" NERDTree
let NERDTreeShowHidden=1
map <silent> <C-n> :NERDTreeToggle<CR>

" close NERDTree after a file is opened
let g:NERDTreeQuitOnOpen=1
You can open/close it using CTRL+n. To open files and split the screen vertically you can use s, to open files and split your screen horizontally you can use i.
Just in case you want to refresh your current working directory you can use SHIFT+r.
indentLine
This plugin will help you with indentation levels. To install it add Plugin 'Yggdroot/indentLine' to your plugins list.
Instead of just having empty space indicating indentation, you can have some special characters to help you indent your code more easily and faster.
Also, if you remember the configuration section in which we set the changed the visibility of some characters, notice that some of them are being used here.
" indentLine
let g:indentLine_enabled = 1
let g:indentLine_leadingSpaceEnabled = 1
let g:indentLine_color_term = 239
let g:indentLine_char = '¦'
let g:indentLine_leadingSpaceChar = '⋅'
autoPairs
This plugin is plain and simple, it adds matching brackets, parenthesis, quotes and etcetera when you're typing code.
All you've gotta do to start using it is adding Plugin 'jiangmiao/auto-pairs' to your plugins list.
You can also use it to move to matching pairs and wrap things. For more information on that you can check their repo.
Learning vIM
So, after all these configurations we can finally start to use vIM itself. In this section I will not teach you how to use vIM, I will give you some tips on how to learn it based on my own experience.
The first and most important thing to keep your mind when you start to use vIM is that it will take you a few weeks to be productive, so avoid using it at work and practice the more you can at home.
Don't be afraid of vIM, force yourself to use it and whenever you want to quit it and go to Sublime or anything else, just don't. As Rocky Balboa said: it's not about how good you can be usim a text editor, it's about how bad you can be using vIM and keep trying. That's how winning is done.
Don't try to learn anything altogether, learn a new thing or two a day, your brain needs some time to process and store that information.
And at last, but not least, strive to be lazy, if you feel like you are using too many keystrokes to accomplish a certain task, there's certainly an easier way to do it, that is the purpose of using vIM.
Getting Started
If you are an absolute beginner and you're into interactive tutorials I highly recommend you to use vimtutor until you learn all the basic movements and edition operations. It is available at your command line, when typing vimtutor it will open a file with some instructions and all you've gotta do is follow them.
If you feel like watching some videos about vIM I highly recommend this talk by Mike Coutermash.
When you are starting it's really important to know about vIM modes, so go ahead and search for Visual Mode, Insertion Mode and Normal Mode (at least).
Keep your focus on learning about the modes I mentioned above, on how to move through files (stick to the basics for now) and how to change some words or add some tiny bits of text.
You should not move out of this phase until you can confortably edit any simple .txt file. You don't need to be efficient, you just need to know how to move through it and change some words and add some new paragraphs.
Getting Productive
I only started getting productive when I learned how to search/replace things and use visual mode efficiently. So this should be your main focus here: efficiently using visual mode and learning how to search/replace.
There's no way to learn these things other than trying, but please, do yourself a favor and read this before getting your hands dirty. As you will notice as you're reading you will have to learn some RegEx magic and I hope you are not afraid of that. Using RegEx to search has many benefits, you get more flexibility while searching, I guarantee it will be another useful tool in your utilities' belt.
Also, if you want to test some regular expressions and see their matching rules in real time I highly recommend you to practice using this website. In my humble opinion this is the best regex tester in the whole internet.
Now, to learn how to use visual mode open a bunch of files and start copying things from one place to another, but don't just press v and move your cursor around, that's not cool. Learn at least how to use visual line and visual block mode.
You will want to avoid using visual mode whenever possible, so if you feel like you can copy/cut things with less keystrokes, go ahead and do it, y and d are your friends.
Also, CTRL+p does auto-completion. Take it on your journey and thank me later.
Getting More Efficient than You Were Before
One of the greatest things about vIM is that it runs straight on your terminal, so you can run commands in it really easily. Take advantage of it and start learning how to better integrate vIM with other command line tools you use frequently. Many times there will be a plugin for what you're trying to do, like fuGITive, which adds some nice git features to vIM, however, you can always use the good and old :!. Bonus points for you if you start using tmux.
Here you should also learn how to manage open files, whether you are using tabs, windows or buffers. I've gotta admit I'm not a pro at this yet, but getting the basics helps a lot to increase your productivity, so do it.
Finally, you can also start looking forward to create your own shortcuts and explore different settings for your .vimrc. Making your text editor more suitable to what you're doing is perhaps one of the greatest things vIM can offer you. It is highly customizable.
Getting Good
Well, I'm not one of those big vIM gurus out there, so I think I may not be fully qualified to write this section. Fortunately, I know some people who are and I know how to become one if you have some available time.
Before anything else, I'd also like to recommend you this awesome talk by Ben Orenstein.
As I said in the beggining, if there's something important about learning vIM is to keep yourself lazy. Always try to find more efficient ways to do things, that's how you will learn. If you are using something you don't know exactly how works, go to vIM wiki and read about it, you may find a whole new way to use it.
Also, whenever you're doing nothing (or scrolling Facebook's newsfeed), read the docs. Yes, that's right, read the docs. vIM's docs are extremely well written, especially the section called "editing effectively", I highly recommend you to read that before moving to the more advanced commands on the Tuning vIM section.
Thank your for reading this!
If you have any doubts, corrections or new tips to share reach me on twitter at @thewizardlucas or at the comments of this post!
Subscribe
Get an email when I publish a new post. I'll never send you spam.
