UX patterns for CLI tools
Most technical people choose GUIs not because GUIs are the best tool for the job. People choose GUIs because the CLI alternatives usually suck.
That's my hunch.
In this blog post, I'll cover good UX patterns for CLI applications.
Furthermore, when applicable, I'll compare how these UX patterns help developers replicate the valuable characteristics of most good GUIs.
The getting started experience
GUIs take users by their hand and lead them down the path to success. CLI applications scream documentation at you and hope you'll either read 10-pages worth of docs or be persistent enough to try a thousand options before getting the output you need.
In other words, GUIs work hard to reduce time to value: the amount of time it takes for a new user to realise value from the tool.
You should do the same in your CLI tools. Instead of spitting out lots of complicated documentation at users, nudge them towards the commands they're more likely to use.
Imagine, for example, that you're building a tool to scaffold and manage NPM package projects.
Instead of showing a complex manual page with lots of options, start with an example. Show users what's the command they're most likely to use first.
Not all "getting started" sections need to be as big as this one I've made. You could highlight useful first commands in many other ways. I'm not making a point about a particular look here.
This section's takeaway is that you should use the CLI itself to deliver a smooth onboarding experience: one that doesn't involve ten pages of documentation.
Interactive mode
To discover all the actions you can perform using a particular GUI, you merely need to open menus and read the available options.
To figure out how to cut a video in QuickTime, for example, you either click "help" and type "cut", look for helpful icons, or click through menus and read the options.
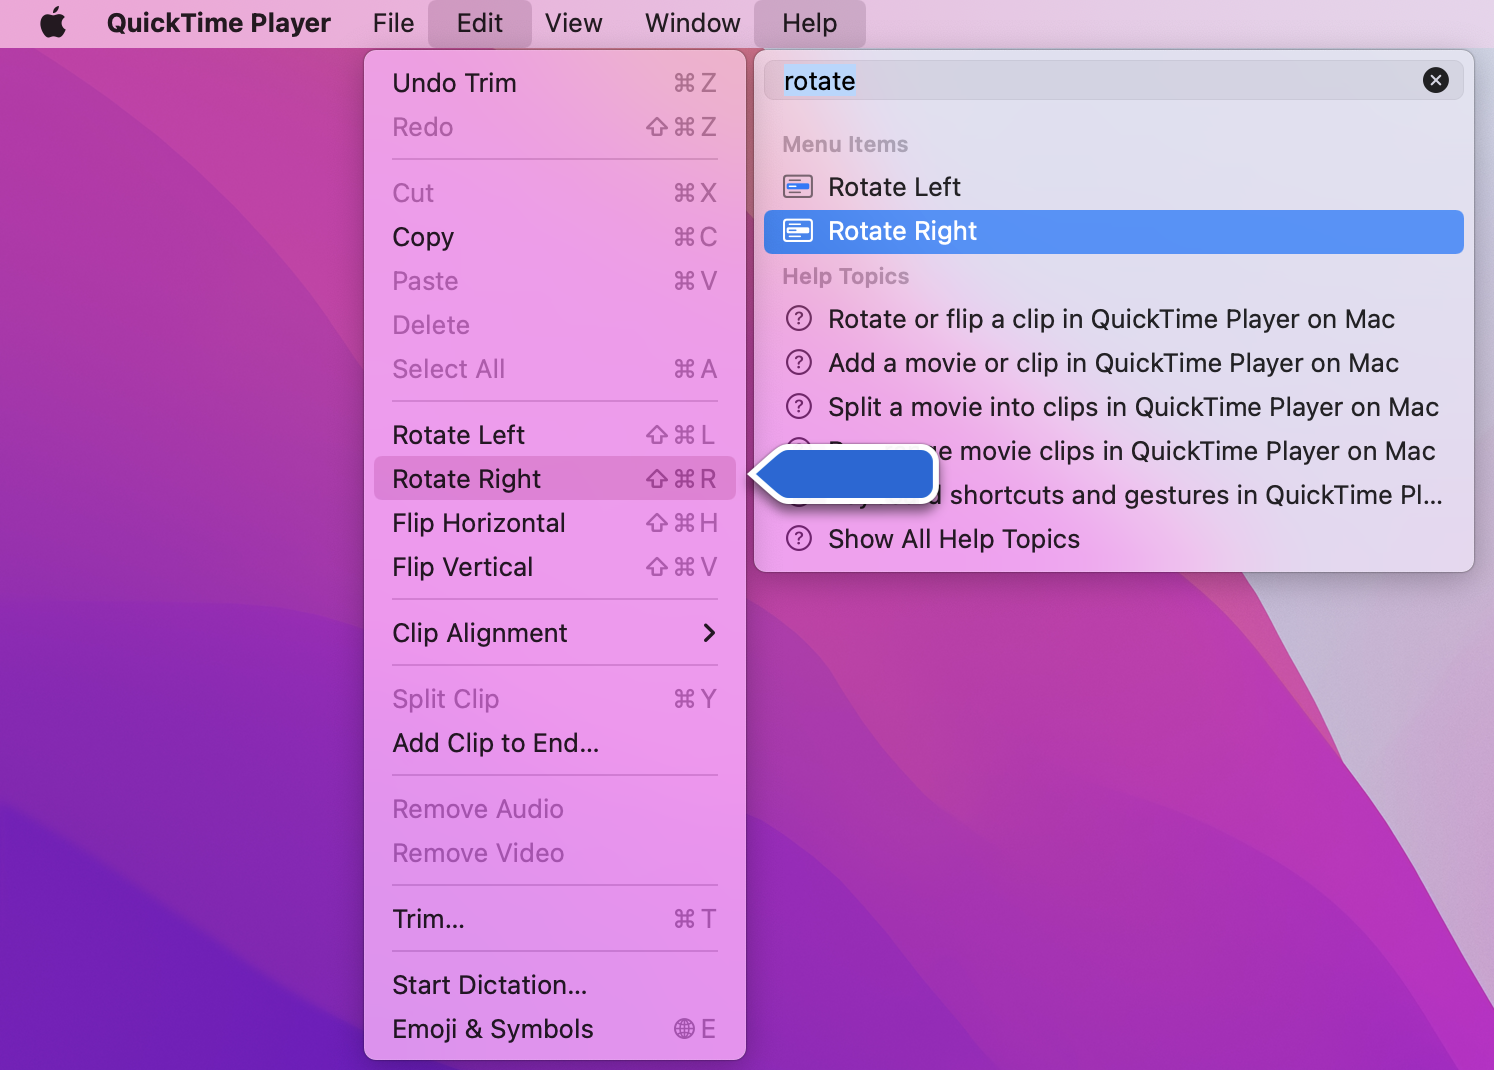
Once you've selected what you'd like to do, most GUIs make the path to success look obvious by telling you precisely the next steps to get to a result.
CLIs, on the other hand, rely on written documentation which is usually long and cryptic. Try typing man ssh, for example, and see if you can quickly figure out which options to use with each command.
Besides being long and cryptic, CLI tools' docs also have too few examples and don't tell people what not to do. In other words, CLI tools make it way too easy for users to make mistakes.
To summarise: GUIs almost always win at discoverability and error prevention.
You can, however, replicate these same characteristics in CLIs by implementing interactive usage modes.
Interactive usage modes will prompt the user for the necessary input instead of expecting people to provide them all at once through a bunch of flags.
When combined with a good "getting started" experience, implementing an interactive mode for your CLI tools will help diminish your time to value.
⚠ An interactive command does not replace a non-interactive one. Once people learn to use your tool, they'll probably prefer non-interactive commands. Furthermore, non-interactive commands are still crucial for automation.
Additionally, by using an interactive mode, you're putting "guardrails" for your user's interactions. You're preventing people from making mistakes because you're constraining their choices.
Finally, another advantage of having an interactive mode is that it demonstrates to users all the things they can do with your software. Instead of relying on people to find the --compress flag to prevent a file from being too large, for example, you can ask them: "Hey, would you like to compress the program's output?".
⚠ Not all shells are interactive, so you must verify whether the user's shell will support the interactive command they're trying to execute.
Input validation and assisted recovery
Think about the last online form you've filled out. Did you have to submit it to see whether any fields were invalid? I bet you didn't. If you did, that was bad UX.
Good forms validate input as you type, and if you make any mistakes, GUIs will tell you how to fix them. CLIs should do the same.
Adding input validation to your interactive mode prompts is a must. It prevents users from putting in a ton of effort only to find out they'll have to redo the whole process because a particular field didn't accept whitespaces, for example.
The same principle applies to non-interactive commands. Take a look at what happens when I make a typo when trying to git commit a few files, for example.

Instead of just yelling at me for trying an invalid command, git politely suggests a similar command.
Implementing that kind of suggestion is such a low-hanging fruit; it astonishes me how so few people do it. In fact, many argument parsers give it to you right out of the box.
In case yours don't, you can go ahead and implement an algorithm to measure the Damerau-Levenshtein distance between two strings. This metric will tell you how many changes a string needs to equal another. You can then iterate through all available commands and suggest the one that's most similar to what the user typed.
Human understandable errors
Having error messages humans can understand is an essential pre-requisite for people to know what they need to do not to see an error message again.
This practice is critical for non-interactive commands because non-interactive commands may take a lot of flags. Additionally, non-interactive commands usually spit out too much information at once, given they hide steps which would otherwise be displayed one by one.
NPM excels at this particular criteria. It may not always have helpful advice on how to fix an error, but it does contain clear information on why the error occurred and who the culprit may be.
Look at what happens when you try to run npm install — the command which installs a project's dependencies — outside of an NPM project.
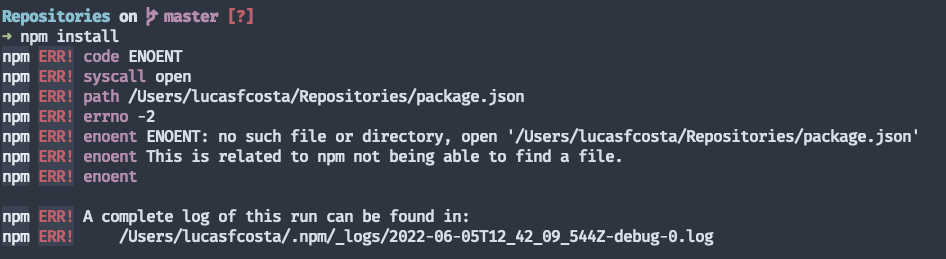
When you try to do that, NPM will tell you it couldn't find a package.json, and, right below, it will tell you that "this is related to npm not being able to find a file". Furthermore, NPM will even give you a complete log file to which you can refer when asking for help elsewhere if you have to.
The only thing which could make this error message better would be if NPM added: "npm install must be run in a folder containing a package.json file. Are you running NPM within the correct folder?". Such a message would provide users with clear, actionable advice on what they could try to fix their problems.
Another aspect I like about NPM's CLI is that it tells you whether a problem is likely to be an NPM problem or a third-party problem. Furthermore, if possible, it will try to suggest ways of fixing your issue, differently from what happened in the previous example.
Repositories on main [?]
➜ npm install
npm ERR! node v6.11.2
npm ERR! npm v3.10.10
npm ERR! code ECONNRESET
npm ERR! network tunneling socket could not be established, cause=connect ETIMEDOUT xxx.xxx.xxx.xxx:8080
npm ERR! network This is most likely not a problem with npm itself
npm ERR! network and is related to network connectivity.
npm ERR! network In most cases you are behind a proxy or have bad network settings.
npm ERR! network
npm ERR! network If you are behind a proxy, please make sure that the
npm ERR! network 'proxy' config is set properly. See: 'npm help config'
npm ERR! Please include the following file with any support request:
npm ERR! /Users/lucasfcosta/.npm/_logs/2022-06-05T13_09_02_091Z-debug-0.log
Colours, Emojis, and Layouting
Don't write CLIs like it's 1999. In 2022 you can have access to the most useful visual aids GUIs offer but without the bloatware.
Most people these days use terminals which support a significant number of colours, which you can use to highlight important information. Furthermore, some terminals also support emojis, which allow for some extra magic.
Yarn, for example, does a brilliant job at highlighting the different parts of its output according to their semantics.
When the output is displayed this way, users can absorb much more information at a glance. If they look at the top and see a yellow message saying "warning", they immediately understand something unexpected is going on. On the other hand, when they look at the bottom, and there's a green message followed by a "sparkles" emoji, it's pretty clear everything went okay despite the warning.
Furthermore, beautiful output is pleasant and makes users come back.
There are, however, a few important guidelines to follow when using colours and emojis:
- Check whether the user's terminal supports them. Otherwise, people will see a bunch of weird characters in their terminals.
- Do not overuse them. These resources should be used sparingly and should highlight important pieces of information. Remember: if everything is a highlight, nothing is a highlight.
- Ensure your tool's output is still "
grepable". Do not use emojis to replace words for which users may want to search.
Besides colours and emojis, another great way to display information is to have a beautiful and organised layout and use tables when the context demands them.
If there's a lot of information to display, it's also probably worth it spending some time creating a pleasant layout to organise widgets.
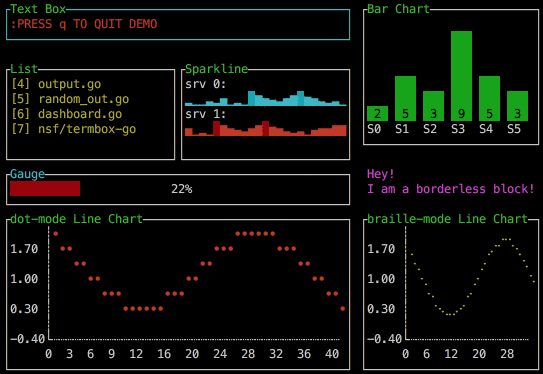
In 2022, you can even have beautiful animated charts if you use libraries like Go's termui. What a wonderful world.
Loading indicators
My favourite part of walking into a treadmill is watching the completion indicator move forward to the right, telling me I'm getting closer to the end of this unpleasant experience. Having a progress indicator helps me not quit because I know roughly when my cardio session ends.
Similarly, tools that don't provide me with an entertaining load indicator make me wonder whether they'll ever finish doing whatever they're doing. Furthermore, it makes me question whether the tool is even working.
Good loading indicators have the following characteristics:
- They tell users what's happening so that people know the tool is working
- They entertain users, making people more likely to wait longer
- They provide users with a notion of how much more people will have to wait
One of my favourite progress indicators is Docker's.
It tells me exactly what it's doing at a granular level. I know which layers it's downloading and how far from completion each download process is. Because downloading images is usually a long process, even when users have fast internet connections, these loading indicators make people more likely to keep waiting.
Had Docker had no loading indicators, I'd be left wondering whether it's doing anything, and I'd probably cancel the pull process before it finishes, even though it'd be making progress at a decent speed.
Now, it's not always possible to tell users exactly how much longer they'll have to wait. In that case, one option is to use data from the previous command execution to estimate how much longer it will take — as most CI systems do. You CI doesn't know how long the next build will take, but it can make a rough guess based on previous build times.
As a last resort, telling users precisely what you're doing and showing an entertaining spinner is enough.
Context-awareness
Context-awareness can mean many different things in the context of Human-Computer Interaction theory. With GUIs, for example, it could refer to how interfaces adapt to the user's screen resolution.
However, within this section, I won't be talking about how CLIs should adapt to the user's terminal emulator capabilities or the size of its window. Even though that's important, I consider readers will be perspicacious enough to consider these factors when implementing tips from previous sections.
Here, I'm actually referring to tools which can pick up meaningful information about the folders from which they're running.
Let's take NPM as an example. NPM is excellent at context-awareness. When installing an NPM package, it will check whether the current working directory contains a package.json file and update it accordingly, adding the newly installed package as a dependency.
Furthermore, the npm install and npm ci commands will behave differently depending on the folder in which they've been executed. These commands will install whichever dependencies are listed in the folder's package.json or package-lock.json files (respectively).
Finally, there are two other nice context-awareness touches in NPM CLI:
- NPM can pick up configs for a specific project through an
npmrcfile. This behaviour allows authors to override system-wide configurations in their specific project, tailoring NPM for their project's needs. - NPM scripts (the "equivalent" to a Makefile's tasks) will use the project's binaries rather than global binaries by default. Using a project's binaries guarantees that users will be running tools compatible with the project's setup.
Exit codes
An exit code indicates whether a command succeeded. A zero exit code means everything went okay. Any other code indicates failure.
Exit codes are a significant part of what makes programs interact nicely with each other. Using exit codes correctly is elementary because it allows your users to combine your tool with others' and write useful scripts to automate their tasks.
If your tool's commands always exit with zero, for example, users' scripts won't know something went wrong and may try to perform further actions which actually depend on your tool's success.
Using exit codes correctly means being a good UNIX citizen.
Besides traditional Linux exit codes, I'd also like to include an honourable mention for user-created exit codes which appear on a tool's output. These are those codes like Xcode Error HE0030, which tool creators use to identify a particular error easily.
These artificially created error codes can make it more practical for people to DuckDuckGo for solutions. Furthermore, you can also have your documentation pages refer to these codes for more information on performing troubleshooting.
Streams
To explain why Streams are important, I'll do something terribly egocentric and quote myself in "Your terminal is not a terminal: An Introduction to Streams":
I love streams because I don't like software.
I always try to build less software. Less software means you have to spend less time updating it, less time fixing it, and less time thinking about it. The only thing better than "less software" is no software at all.
Streams help us write less software because they allow programs to communicate with each other.
If programs cannot communicate, they must have too many features to satisfy their user's needs, therefore creating more software. By enabling inter-process communication, streams encourage software to be smaller and sometimes can even prevent software from being written.
As I mentioned in the above passage, streams benefit both you and your users. First, they help your users integrate your tool with other tools, allowing for more flexible use-cases. Consequently, because people can integrate your tools with others, you don't need to write as much software, and, with less software, you'll have fewer issues to solve yourself.
Using output streams is reasonably straightforward. You just need to follow these two golden rules:
- All errors go into
stderr (2). - All other output goes into
stdout (1)
Directing output to the correct streams allows users to more easily integrate your program with others and capture only the information they need.
There's yet a third rule, this time for the input stream, which is even more crucial for ergonomics:
- Allow data to be passed in through
stdin (0).
Imagine, for example, that you have a has-character program which checks for the presence of a particular character in a text file. If you allow users to provide input through stdin, they could use your program by running the following command:
$ curl https://example.com | has-character "_"
On the other hand, if you do not allow for input to be provided through stdin, users would have to save the curl output to a file and pass the file's name as a flag to your program.
In this case, passing a filename wouldn't be as inconvenient because it's easy to save cURL's output to a file through a flag, but it would be pretty annoying to do that in many other cases.
In other words, by allowing users to pass data into your program through stdin, they can more easily combine your tool with others in a single command.
Thanks to stdin, users can just use a | instead of interacting with prompts or saving data to a file and passing the filename through a flag.
Consistent commands trees
One of the reasons I find Kubernetes so intuitive to interact with is because of the thoughtful command hierarchy of kubectl.
When I'm using kubectl, I can easily guess what command I need to use based on commands I've used before.
Imagine, for example, that I've just listed all pods in a namespace using kubectl get pods --namespace=my-namespace. How would I list all deployments? Easy, kubectl get deployments --namespace=my-namespace.
The same command hierarchy applies to all types of resources. Furthermore, the command's flags follow a similar principle.
If you use the --output="jsonpath={.status}" option to get a pod's status, for example, you'll know you can just change the jsonpath notation to get any other property of any other resource.
Furthermore, kubectl is consistent with Kubernetes concepts and teaches me about them as I use it.
Logs, for example, are not a "first-class resource" like pods or configmaps. Therefore, I don't use kubectl get logs my-pod to get a pod's logs. Instead, I omit the get.
The get is not the command I want to use because I don't want to get a "log" resource with a particular name. I actually want to use the log command for a specific pod. Consequently, I use kubectl logs my-pod.
Like having an interactive shell, having consistent sub-commands is excellent for discoverability. When you have a consistent command tree, users can guess how to do things.
Get in touch
If you liked this blog post, share it on Twitter and follow me @thewizardlucas.
Disagree, want to ask questions, or have a conversation? Email me at lucas@lucasfcosta.com.
Subscribe
Get an email when I publish a new post. I'll never send you spam.
